
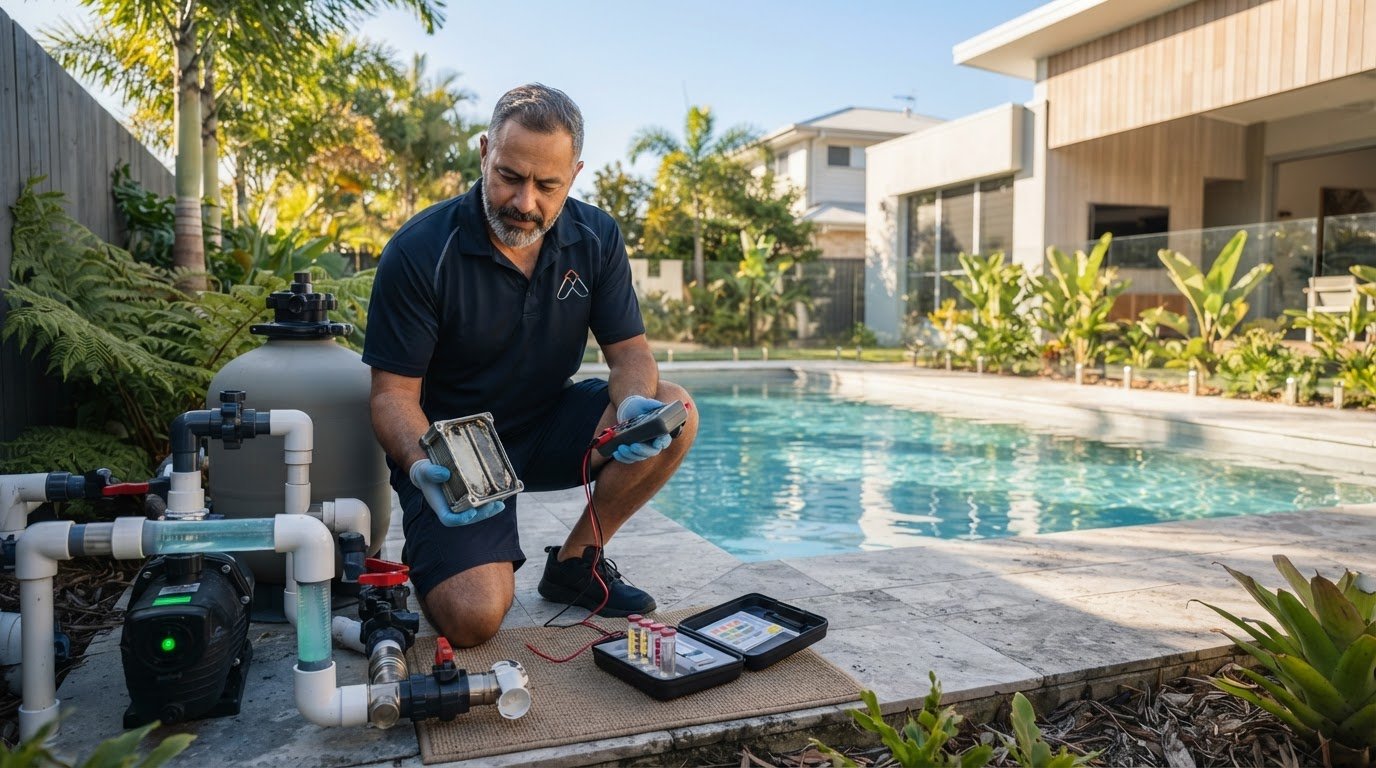
Start with the power supply, not the salt. If your salt chlorinator isn’t producing chlorine, troubleshooting means checking that the unit has power, then assessing the cell, salt level, water flow and sensor readings. For many Australian chlorinators, the pool’s salt concentration should be around 4,000-5,000 ppm, but the correct range depends on the cell.
It’s easy to suspect a worn cell when chlorine readings fall, but low salt, restricted water flow or unbalanced water can also reduce production. This guide explains how to check the unit’s power and indicators, inspect the cell, test water from the chlorinator return, and look for salt, water-balance or sensor issues. The results can help narrow down the cause and guide your next step.
Key Takeaways
- Begin with the chlorinator’s power and display indicators before assuming the cell has failed.
- Look for calcium build-up on the cell, and use the manufacturer’s recommended cleaning method.
- Test water from the chlorinator return to distinguish chlorine production from a low pool reading.
- Check salt level, water balance and flow, as each can affect chlorine output or trigger a warning.
- Compare sensor readings with a separate salt test to help identify a faulty sensor.
Symptom-Checker: Why Is My Salt Chlorinator Not Working?
Start by checking the chlorinator’s power, water flow and cell condition. A fault in any of these can interrupt chlorine production. Inspecting the cell for calcium deposits is a practical first step, particularly if the control panel shows a cell warning.
There’s no single daily run time that suits every Australian summer and winter. Run the chlorinator while the pump circulates water, then adjust its operating time and output based on regular free-chlorine tests and seasonal demand.
- Check the control panel and water flow first. Confirm the chlorinator is switched on and note any warning lights before opening the cell housing. Check that the pump and skimmer baskets aren’t clogged, the filter is clean, and directional valves are open. Restricted flow can trigger the flow switch and stop the cell from operating.
-
Inspect and clean the salt cell
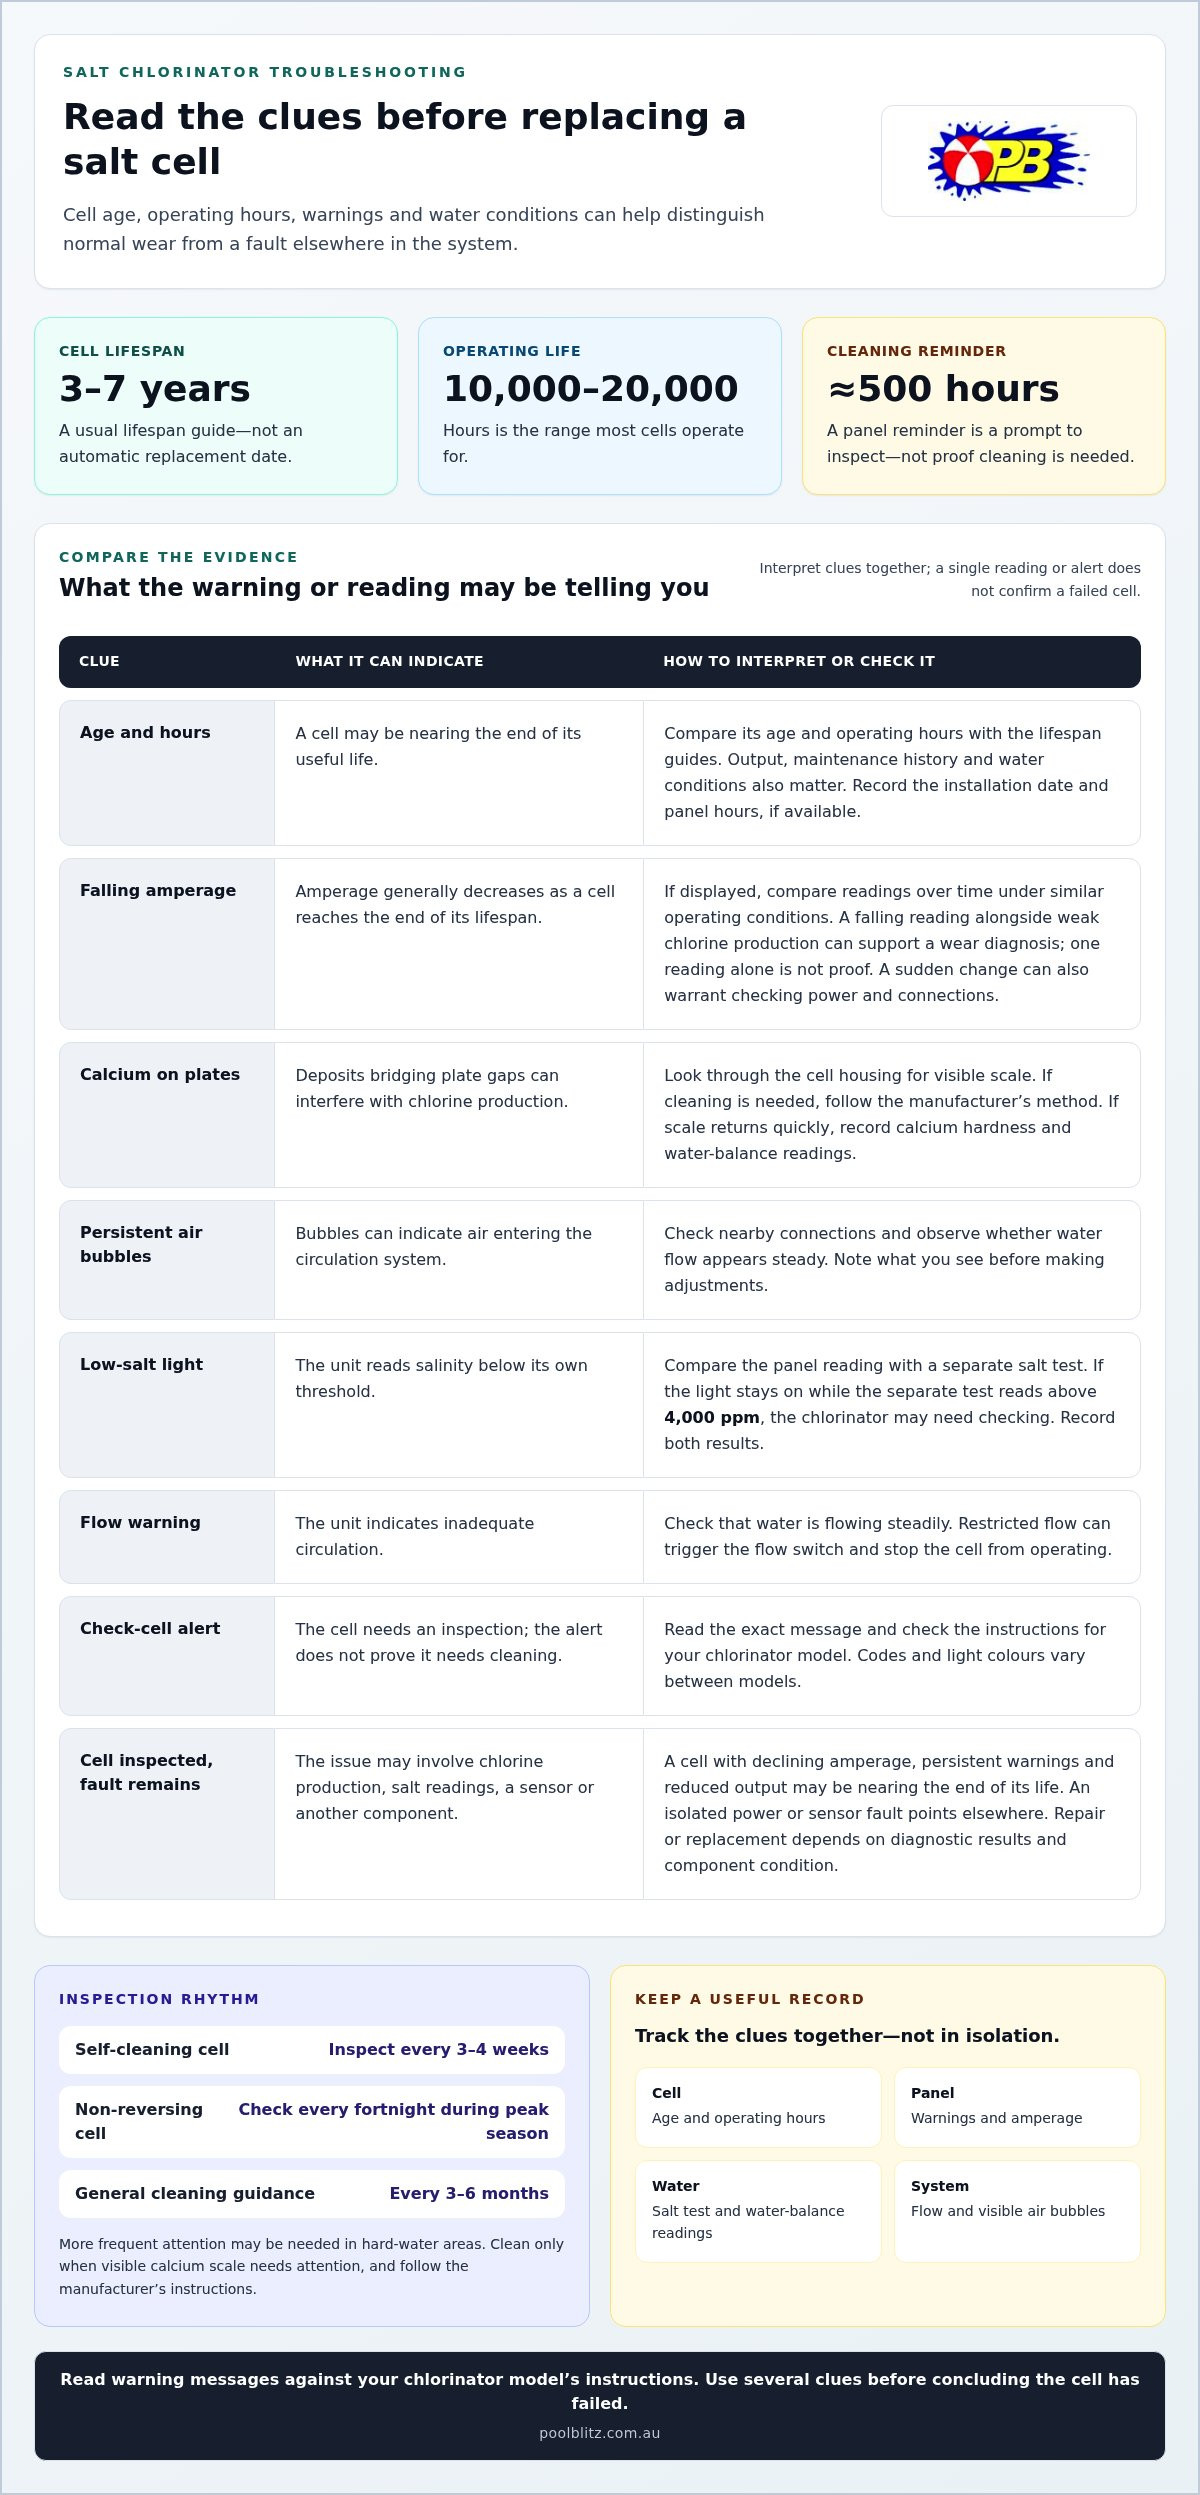
Switch off the chlorinator and pump before removing the cell, then inspect the metal plates for deposits, damage or debris. A self-cleaning cell reverses polarity to help remove calcium, but it can still need inspection every 3-4 weeks. Non-reversing cells should be checked every fortnight during peak season.
Use a torch to look between the plates without scraping them. Deposits bridging the gaps can interfere with electrolysis, while a damaged plate needs more than routine cleaning.
-
Remove calcium scale from the cell
Clean the cell only when visible calcium scale needs attention, and follow the chlorinator manufacturer’s cleaning instructions. Use its recommended cleaning solution, allowing about 10 minutes for it to dissolve calcium deposits before rinsing the electrode.
Avoid metal tools and forceful scraping, which can damage the cell plates. If scale returns quickly, record the pool’s calcium hardness and water-balance readings. Repeated build-up can point to a broader water-maintenance issue.
- Set a sensible inspection routine. Cleaning is generally advised every 3-6 months, with more frequent attention potentially needed in hard-water areas. A control panel’s check-cell reminder may appear approximately every 500 hours, but treat that as a prompt to inspect, not proof that the cell needs cleaning.
- Account for temperature and seasonal chlorine demand when adjusting runtime. Keep the pump circulating while the chlorinator operates, and use free-chlorine test results to guide changes instead of following a fixed summer or winter schedule. If testing shows chlorine production isn’t keeping pace with demand, a longer run may be needed.
- After rinsing and reinstalling the cell, restore power and check the panel for warnings. Confirm water is flowing through the system, then note whether the warning clears. If the cell is clean but the unit still reports a fault, check chlorine production, salt readings and sensors next.
Salt cell lifespan and warning indicators
A cell’s age, operating hours and warning pattern can help distinguish normal wear from a correctable fault. Consider these clues together before deciding whether the cell or control unit needs attention.
- Compare the cell’s age and operating hours. A salt chlorinator cell usually lasts 3-7 years, and most cells operate for 10,000-20,000 hours. These are useful guides, not automatic replacement dates: output, maintenance history and water conditions also matter. Record the installation date and hours shown on the control panel, if available, to make changes in performance easier to track.
-
Inspect the cell for scale and air leaks
Look through the cell housing while the system runs. Check for visible calcium deposits and persistent air bubbles. Calcium build-up can bridge gaps between metal plates and interfere with the cell’s ability to convert salt into chlorine. Bubbles can indicate air entering the circulation system, so check nearby connections and observe whether the flow appears steady.
Note what you see before cleaning or adjusting anything. This gives you a clear comparison if the warning remains afterwards.
- Check the cell amperage on the control panel, if displayed. Amperage generally decreases as a cell reaches the end of its lifespan, so a falling reading alongside weak chlorine production can support a diagnosis of wear. Compare readings over time under similar operating conditions rather than treating a single reading as proof. A sudden change can also warrant checking the power supply and connections.
-
Interpret warning lights and error codes
Read the exact display message and compare it with the instructions for your chlorinator model. A low-salt light indicates a salinity reading below the unit’s threshold; a flow warning indicates inadequate circulation, while a check-cell alert calls for an inspection. Codes and light colours vary by model, so don’t assume a message means the same thing on another unit.
If the low-salt light stays on while a separate test reads above 4,000 ppm, the chlorinator may need checking. Record the message and salt test result.
-
Assess repair or replacement needs
Match the fault to the component before choosing a repair. A cell with declining amperage, persistent warnings and reduced output may be nearing the end of its lifespan. An isolated power or sensor fault points elsewhere. Control-unit repair or replacement depends on diagnostic results and the condition of its components.
In Australia, the cost depends on the situation. The cell or control unit, diagnosis, parts and labour all affect the price, which is provided after a quote request.
- Keep a short record of cell age, warnings, amperage and test results. If those checks indicate an equipment fault, pool equipment repairs can help assess the issue and identify the next practical step. A clear record helps focus attention on the cell, control unit or another part of the system.
Checking whether the generator is producing chlorine
Test the chlorinator itself before treating a low pool reading as proof that the generator has stopped. Check water flow, power and salt level, then test the return water.
-
Check pool water flow and system errors
Confirm the pump is running and water is moving through the cell before testing output. Check that the pump and skimmer baskets aren’t clogged, the filter isn’t dirty, and directional valves are open. These restrictions can reduce flow below the sensor’s minimum threshold, stopping the chlorinator even when its cell is clean.
Check the control panel for a flow warning or another error. Note the exact indicator, then see whether it clears once normal circulation returns.
-
Check the power supply
Check that the chlorinator is switched on, then inspect its display, production lights or dial. An illuminated control panel shows that the unit has power, but doesn’t prove the cell is generating chlorine. Compare the output setting with the indicator showing whether production is active.
Don’t open the control unit or touch electrical connections. If the panel is blank, keeps resetting or shows a persistent fault, record the symptoms for diagnosis.
-
Check the salt level
Test pool salinity with salt test strips or a suitable pool test, then compare the result with your chlorinator’s operating range. Most Australian salt chlorinators operate best at 4,000-5,000 ppm, although the correct level depends on the cell. Lower salt levels mean reduced chlorine production.
Australian pool owners are advised to monitor salt weekly, with more frequent testing during summer and after heavy rainfall. If a separate test reads above 4,000 ppm while the low-salt light stays on, the chlorinator may need checking.
- Set the chlorinator output to 100% for the production test. Check the cell is clean, then look at its production lights or needle, if fitted. A visible cell housing may show cloudy water while the cell is active; clear water can indicate that chlorine isn’t being created. Treat these signs as clues, then confirm with a water test.
- Take a sample directly from the chlorinator return. Cover the test tube opening with your thumb, place it into the return eyeball, then collect the water. Test after the pool’s chlorine reading reaches nil, because earlier chlorine dosing can make it difficult to isolate the chlorinator’s contribution.
- Compare the return-water result with the pool reading. A return-water test can help indicate whether the chlorinator is producing chlorine; if no chlorine is detected, the unit may need checking. If the test shows no chlorine despite strong output, very high chlorine may have bleached the test tablet. Dilute the sample and test again.
Diagnosing pool water and chlorine problems
Test free chlorine and water chemistry before adjusting the chlorinator, as pool conditions can affect chlorine readings. Don’t swim if a test shows no free chlorine. Restore the pool’s chlorine level and confirm it with testing before swimming.
- Test the pool water with a reliable kit, recording free chlorine and pH together. A low chlorine reading doesn’t automatically mean the generator has failed: water balance, sunlight and contaminants can all affect the result. Record the readings and test times together so you can compare changes after an adjustment.
- Compare pH with the range for your pool surface. The recommended pH is 7.0-7.4 for fibreglass pools and 7.2-7.8 for other pools. Low pH can make chlorine activity faster and cause chlorine to burn off sooner; high pH can reduce chlorine’s effectiveness. Correct pH before concluding the chlorinator output is inadequate.
- Check total alkalinity and, for an outdoor pool, cyanuric acid stabiliser. The recommended total alkalinity range is 80-120 ppm, while the recommended stabiliser level outdoors is 20-50 ppm. These water chemistry factors influence pool balance and chlorine performance, so record them alongside the display readings before changing the output setting.
- Consider algae pressure if the chlorinator appears active but free chlorine remains low. Phosphates and nitrates can feed algae, which may consume chlorine nearly as quickly as it is produced. Chlorine can also drop by up to 90% during a hot summer day, so test after hot weather and check the pool for early algae growth.
- Retest carefully if a chlorine test shows zero after recent treatment or strong chlorinator output. Extremely high chlorine can bleach a test tablet and produce a misleading result; dilute the sample and test again. For routine monitoring, check free chlorine once a week and adjust the chlorinator based on the reading.
- Use the combined results to decide what to adjust first. Correct pH or alkalinity if readings fall outside the recommended ranges, then reassess free chlorine. If the water balance is on target but chlorine remains low, compare the pool result with the chlorinator’s output test rather than increasing output without checking.
Dirty or faulty sensors
A chlorinator sensor can report incorrect salinity, temperature or water-flow conditions, even when pool readings suggest otherwise. Compare the unit’s display with independent tests before changing settings or adding salt.
- Record the warning and sensor reading before making adjustments. Note whether the chlorinator reports low salt, inadequate flow or another condition, then compare it with what you observe at the pool. For example, a low-salt warning alongside a normal independent salinity result may point to a sensor or control issue, rather than proving the pool needs more salt.
- Test salinity separately using salt test strips, as a salt sensor can be faulty. Follow the strip instructions and compare the result with the chlorinator’s display and the operating range for your specific cell. Most Australian salt chlorinators operate best at 4,000-5,000 ppm, though the required level depends on the model. Don’t add salt based only on a warning light.
- Repeat the comparison after the pool water has circulated and the test sample is collected carefully. Tests taken at different times or from different parts of the pool can be difficult to compare. Record the time, independent salinity result and display value together; a consistent mismatch is more useful for diagnosis than a single result.
- Inspect the sensor area for visible debris or deposits, following the chlorinator manufacturer’s instructions. Don’t scrape the sensor or apply a cleaning chemical unless the instructions allow it, as this can damage the sensing surface. If the warning continues after cleaning as directed, treat the sensor reading as suspect and keep the test results for a technician.
- Check the rest of the water chemistry before blaming a salinity sensor for every production problem. Test pH and total alkalinity, with the recommended alkalinity range at 80-120 ppm. An out-of-range result can affect water balance, but it doesn’t establish that the salt sensor is faulty. Keep chemistry results separate from salinity readings when assessing the cause.
- Compare sensor behaviour with actual circulation. A flow sensor may stop chlorination if water flow falls below its minimum threshold, so check whether the pump is running and the system is circulating. If flow appears normal but the chlorinator continues to show a flow warning, note when it occurs and whether the display changes as the pump operates.
- Use the combined evidence to choose the next step: repeated test-strip and display differences suggest a salinity-sensing problem, while a matching low reading calls for addressing pool salinity. If chemistry readings also need interpretation, get expert water balancing to help identify which water factors are affecting chlorination.
Pool Blitz: Regular Pool Servicing
Pool Blitz’s Regular Pool Servicing includes ongoing care for pool water and equipment, with routine water balancing to help identify when chlorine levels or salt readings need attention. If your tests point to a persistent chlorinator fault rather than a water-balance issue, Pool Blitz also repairs pool equipment. Casual Pool Servicing provides occasional support, and Pool Chemicals are available for pool care.
Regular servicing can help when readings keep shifting, warning indicators return, or you’d like support maintaining consistent water quality. Share your test results and chlorinator symptoms so the issue can be assessed in context.
Contact Pool Blitz to discuss your pool servicing needs.
Build a steadier pool-care routine
Use this salt chlorinator not producing chlorine troubleshooting guide as a starting point, then build a practical pool-care routine from what you learn. Keep a simple record of service dates, equipment concerns and water-test results. Over time, that history can help distinguish a recurring issue from a one-off change and make pool maintenance more straightforward.
Pool Blitz offers Regular Pool Servicing for ongoing pool care and Casual Pool Servicing for occasional support. If your robotic pool cleaner needs attention, Pool Blitz also offers robotic pool cleaner repairs. Choose the service that best matches your needs, whether that’s routine care or a specific equipment concern.
For help deciding on a suitable next step, contact Pool Blitz. A clear plan can make looking after your pool feel more manageable, so you can get back to enjoying it.
Frequently Asked Questions
Is power reaching the unit?
Check the chlorinator’s switch and display, then see whether its production light or dial indicates that it’s operating. A lit display shows the panel is receiving power, but doesn’t confirm the cell is generating chlorine. If the display is blank, check the relevant switch position and note whether the pump is running. Don’t open the control unit; record any fault message to help narrow down the issue.
The salt reading is “off”. Can I calibrate the system?
Compare the displayed salinity with a separate salt test before changing settings. Calibration options vary by chlorinator model, so use the instructions for your unit rather than applying a generic adjustment. Calibration changes how the sensor reports a value; it doesn’t change the actual amount of salt in the pool. If the independent test and display continue to disagree, a sensor fault may be involved.
How do I check salt level in a pool for a salt chlorinator in Australia?
Use salt test strips according to their instructions, then compare the result with the operating range for your chlorinator model. Most Australian salt chlorinators operate best at 4,000-5,000 ppm, but cell requirements vary. Take a fresh sample after heavy rainfall or before adding salt, and record the result. Weekly monitoring helps you spot changes without relying only on the unit’s sensor.
How do I clean a salt chlorinator cell safely, and how often?
Follow your chlorinator manufacturer’s instructions and use only its recommended cleaning solution. Cleaning is generally advised every 3-6 months, with more frequent attention potentially needed in hard-water areas. Allow the recommended solution about 10 minutes to dissolve calcium deposits before rinsing the electrode. Avoid scraping the plates or using unapproved chemicals, as these can damage the cell’s working surfaces.
How do I test pool chlorine, pH and stabiliser when a chlorinator isn’t producing chlorine?
Use a pool test kit to measure free chlorine, pH and cyanuric acid stabiliser, and write down all results together. Recommended pH is 7.0-7.4 for fibreglass pools and 7.2-7.8 for other pools; outdoor pool stabiliser guidance is 20-50 ppm. If a chlorine test seems unexpectedly blank after strong production, dilute the sample and retest, as very high chlorine can bleach a test tablet. This salt chlorinator not producing chlorine troubleshooting step helps distinguish a misleading test from low output.
How can I tell whether a salt chlorinator cell has reached the end of its service life?
Compare the cell’s age, operating hours, amperage and chlorine output rather than relying on one warning. Cells usually last 3-7 years, and most operate for 10,000-20,000 hours. Amperage generally falls as a cell nears the end of its life. A dated record of readings can show a steady decline, while poor output alongside balanced pool water strengthens the case for further cell assessment.
How do I check chlorinator pump flow, filter pressure and water temperature?
With the pump running, check that water is circulating and look for a flow warning on the chlorinator display. Read the filter gauge and compare it with the pressure recorded after the filter was clean; a rise can indicate restricted flow. Check water temperature with a pool thermometer and compare it with the chlorinator’s operating limits. Many models list a range around 60-140 °F, but limits vary.
How do I troubleshoot a salt chlorinator that shows low salt despite correct salinity?
Retest a fresh pool sample with salt test strips and compare it with the chlorinator display. If the independent result is above 4,000 ppm but the low-salt warning remains, the sensor may be faulty or the unit may need checking. Record both readings and the exact warning, and avoid adding salt based only on the display. For salt chlorinator not producing chlorine troubleshooting, this comparison helps separate a sensor reading problem from genuinely low salinity.
No responses yet